An age-old debate in PLC programming: investigating the uses and caveats of latching software commands versus seal-in ladder logic for industrial control applications.
One of the most popular programming languages used with industrial automation controllers today is called ladder logic, following in the footsteps of the previous method of control which used interlocking electrical relays.
The ladder language uses graphical contacts, coils, and blocks to represent the logic instructions. As with nearly all programming languages, there are multiple ways of creating a programmed solution within the language. These multiple ways may produce a similar result, but programmers will often land on a desired method and stick to it.
A common discussion revolves around using seal-in logic vs. using latch and unlatch commands to create an output that remains on until commanded otherwise.

Figure 1. Physical buttons are some of the most common input devices at the heart of the seal-in/latch debate.
Latching Commands
In pretty much every PLC program, there are latching coils; these coils will set a variable (like an output) to become true when the rung is true, but then remain true even after the rung becomes false. An unlatch coil attached to the same variable will have the reverse logic, it will force the variable to become false as soon as the rung is true.
From a programming sense, it might be easier to think of a latching coil as assigning a value to a variable. When the latching coil is true, the variable is set equal to 1. Then, when the unlatching coil is true, the variable is set equal to 0.
For this reason, they are called latch and unlatch, but it is also very common to see ‘set’ and ‘reset’ which mean exactly the same thing.

Figure 2. An example of input commands being used to either latch (set) or unlatch (reset) a variable.
This style of programming allows variables to be set true in one routine and false in other routines, and can greatly reduce the amount of visual space the code takes up on the screen. It also allows for entirely different complex conditions to unlatch the variable vs the conditions required to latch the variable.
The downside to using latches is if your conditions for the latching coil do not go false before the unlatch coil is solved, the variable will be held true even if you try to unlatch it someplace else. This problem can increase troubleshooting time and can get programmers into tricky scenarios. Often programmers will use a one-shot rising / falling bit in front of a latch to ensure the conditions will only be true for one scan.
Seal-In Logic Structure
The ‘seal-in’ logic is often used for initializing a process, such as turning on motors with a momentary start and then later ending with a similar momentary stop push button.
The logic works by branching around the input condition(s) using the same variable as the output coil. The stop button, or stop conditions, are then placed in series before or after the branch in a normally closed state.
When the output goes true, the input conditions are said to be “sealed in” since the start command can be removed, but power will still flow to the output. When the stop conditions are met (contact becomes open), the output turns off and the seal is broken.

Figure 3. Seal-in logic.
The benefit of this logic is that both the start and stop conditions are kept in one place, making it great for starting a process like a fan motor or starting a robot task.
The downside occurs if you have a lot of start or stop conditions, the series of commands and parallel branches of the rung can get unruly and difficult to read, usually expanding it to two rows on the screen.
Also, when using momentary coils, it is difficult to have multiple stop conditions or multiple start conditions for the same output. Additional handshake bits are required if you want to break the seal from other parts of the program. If not, you can end up with conflicting bit references and inconsistent machine operation.
“Latching Kills”
Well, perhaps that’s not really true all the time, but often I have heard this statement when referring to latching logic. The premise is that outputs may easily become stuck in the on position because there is an error in the unlatch or the latch logic. This is certainly one caveat to using latches, but it can easily be solved by cross-referencing your variables and making sure you have an unlatch for each latch.
The latching logic method produces much cleaner logic that is easy to read and follow, but can be overused to produce a web of complex latching and unlatching coils, especially when they exist across many subroutines.
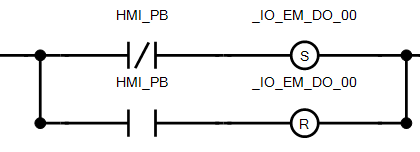
Figure 4. If this is a normally open button, this latching logic will create an ‘always-on’ condition.
The logic example shown above is a simple erroneous case of an output that would only turn off (reset) when the N.O. button is pressed. As soon as the operator releases the button, the output will turn back on (set). If that output is a fan, it will never turn off.
The logic may have been intended to look like the image below. When the N.O. button is pressed, the output turns on (set). Then when released, it turns off (reset). A simple mistake of a normally closed vs open can result in output being on all the time.
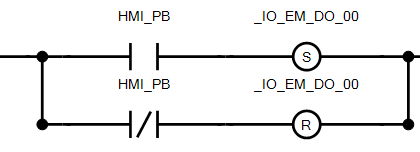
Figure 5. Proper latch/unlatch logic for a normally open button.
A Healthy Mix
Just like everything else in life, latching or seal-in logic should be used with a heap of moderation.
You won’t be able to solve every problem with latching coils and not every output needs to have seal-in conditions. The previous example of bad logic could certainly exist for either latching or seal-in logic, neither method is immune to problems.
I typically use latching logic when I want to handshake to another piece of code or another task, such as setting expected bits from a sequence. Instead of having complex code or calculations in my sequence, I’ll simply latch a bit from the sequence and then unlatch it when the calculation code is complete. The same is true with devices like cameras. I might latch a trigger bit in the sequence and then unlatch when the camera is done.
I often use seal-in logic when commanding motion devices such as servos or robots, this way I can add conditions where I might want to stop the motion before the end of the command. If I’m commanding a servo to move a linear actuator but some other tooling moves when it shouldn’t I can use a seal-in condition to issue the stop. HMI and physical push buttons often use seal-in conditions when you have a single function button like start and stop.
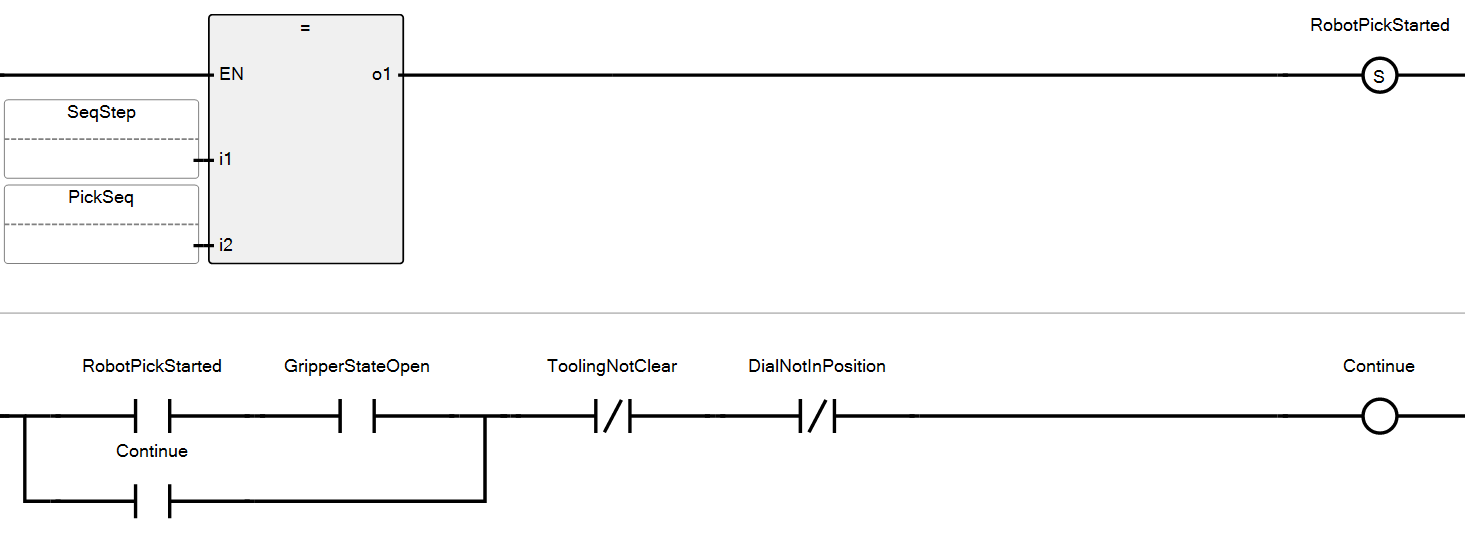
Figure 6. Comparing scenarios for latching (set) logic versus seal-in logic.
What is the Final Answer? Seal-in or Latching?
So here we arrive at the end of the article with no absolute conclusive recommendation. But this is typical for control automation, the situation determines the proper method. Plus, there are many scenarios in which you could use either method equally, and there is no right answer. By memorizing both methods and using careful consideration in order to apply them, you should be able to get out of most programming jams you encounter.
Copyright Statement: The content of this website is intended for personal learning purposes only. If it infringes upon your copyright, please contact us for removal. Email: admin@eleok.com